Viair X'Treme Duty OBA installed in TJ

WolfGT

LIFETIME
SUPPORTER
#1
It is finally time to install the On-Board-Air system I purchased two years ago. The system is from Viair. It is the X'Treme Duty OBA setup. Specifics can be found here: http://www.viaircorp.com/oba-xtreme.html.

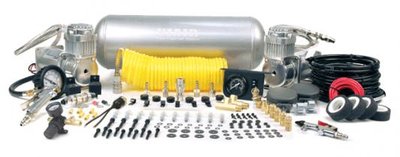
This is a picture from the website of what comes in the kit.
obakit.jpg

I'm going to try to put as much detail as I can in this thread along with pictures. Because I really have not found very good information on a clean and reliable way to mount this system in a TJ.

If you have any questions along the way, I will do my best to answer them.

Here we go.
 

WolfGT

LIFETIME
SUPPORTER
#2
I figured the first thing I would attack was finding a mounting place for the tank. It's a 2 gallon tank. It is a small tank, but when looking for a place that is out of the way and protected, it feels pretty big. I have seen some people put it under the jeep on the driver side right behind the skid plate inside the frame rail. I had issues getting it to fit well but after some thinking, I believe I have it figured out. Here is the spot I'm talking about.

09E03D94-C40B-4A00-B62E-59209A039218_zps6wfxcnga.jpg

And here is the tank held into place.

8C129B1C-6D6A-4A60-A728-2BC916FA7120_zps2keqhzjf.jpg

You can see that it is above the main skid plate and also above the bottom of the frame rail. There are three issues mounting it in this location oriented like this.
  1. It is not protected very well.
  2. The threaded hole you see on the side facing the center of the jeep is actually supposed to be on the bottom to put in a drain to remove water from the system.
  3. There are brake lines and wiring on the side of the frame rail where I intend to mount the tank.

So I pulled out my stash of mountain dew boxes and started to make a template for the brackets I need to make. This is what I came up with for the front bracket.

3DEA2BF5-2242-4293-91BF-C4F10D0B81AB_zpsc3lj6c1e.jpg

Soon realizing that if I made it this way there would be no way to actually get it in position. So, since it needed to be wider anyway to accommodate the mounting holes on the tank, I split the top and flipped it out, perfect.

47C1E79D-9E9C-40CD-8783-DD2F8735B8AA_zpslnkmcbyn.jpg

So here is my template.

92A2EFA6-CDC2-4E22-BF2D-E1FC1E58A6CD_zps4bjonowz.jpg

I plan to scan it in and include it in this thread later for anyone that may want to follow along.

Into the scrap metal pile. I found an old treadmill base that has the right thickness of metal, so I laid out the template and started cutting.

C63B783A-33FD-4D7F-8681-E8A35118A7FF_zps8mplesrj.jpg

AB553EC6-D1EB-4E7A-9352-1AEB9E98A8E4_zpsynejigy7.jpg

085133BA-73A2-49EC-B61C-002F519166AF_zpsv0q1az7b.jpg

16DE93C8-0D7F-4BBE-A07C-D0DBA5579887_zpsxixhcwie.jpg
 

WolfGT

LIFETIME
SUPPORTER
#3
I cleaned up the edges and started to bend it in to shape.

50D602F4-EA1F-45D8-89E7-FD68209FAE3E_zpsytubdrf9.jpg

57A60514-C01A-48F7-A83E-C11EA9431967_zpsjb27n5qv.jpg

AND ...... screwed the pooch on this one. facepalm

60C66517-66C0-4CA7-823A-3B43D50D4096_zpsq877hl8v.jpg

So, after getting pissed off an tossing it across the shop, I moved on to the location of the compressors. After a bunch of thinking, I did not think they would fit on the tray under the brake booster, but if they did, that would be the ideal spot. So, I opened it all up and removed my existing ARB compressor that I already had installed in that spot (a much smaller compressor). I must admit, having the side window in the MetalCloak fender really helped in this part. Here they are in place temporarily.

67303E10-1E60-4E5E-95FF-0A207C4688BF_zpshz0rckej.jpg

7BA79F6A-2DD2-4260-AEDD-29243E2D4C36_zps0k5en58z.jpg

Just a note. Notice that the braided line is missing from the compressor farthest inboard. That is because the pre-installed line comes straight out and interfered with the brake booster. I removed it and will be installing a 90 degree fitting later.

A shot from the side.

9FDE9704-1AF6-483D-8161-6C454346D56E_zpss7m4s8ia.jpg

Now for the modifications. Because the wiring harness enters the engine bay right there, you cannot pull the compressors all the way against the fender side of the tray. So, this pushes them toward the center of the engine bay and one corner of one of the compressors has no tray to sit on. So I made a template and added metal to the tray.

72548654-7CA3-429C-97C6-8BB3822159DA_zpsk3reijfr.jpg

Here it is after some primer and paint. Before drilling the mounting holes. Notice the lip at the top of the tray. I ground it down so that the mounting plate of the compressors would sit above on their rubber feet and not come in contact with the tray directly. I did that on the bottom side too, you just can't see it in the picture. I did this because I was worried if it was metal to metal, the vibrations through the firewall would be unbearable.

944008D3-458E-4F2F-B050-6989EA8DAFDD_zpsee3otoua.jpg
 

WolfGT

LIFETIME
SUPPORTER
#4
And here are the compressors sitting in place so the holes can be marked.

5F1EF060-E62A-4C3E-A84C-45697A77610F_zpsqtx4cx0f.jpg

552244F9-A7F7-482E-A4B2-0F4C9E63AB91_zpsvgyev4mb.jpg

After the holes were marked, I drilled the holes and put the tray back in to see if there was any interference with the bracket the tray mounted to. There was, but luckily only one hole was blocked. Here is the bracket with the spot marked that I needed to clearance.

29C582BD-A494-4EC2-81A3-8C53B94533E0_zpsgrnshc8p.jpg

After clearancing that spot, I mounted the tray and started to bolt them down. Three bolts in, I noticed that the barbs for the inlet lines were coming in contact with the inner fender. So I pulled them back out for now. I will pick up some 90 degree fittings for those also. And, putting washers and nuts on 8 bolts blind and around brackets is a real pain, I will be installing nutserts in the tray to ease installation.

That is where I stopped. I will be back in the shop on Saturday and plan to finish this up. I will not be bending the tank brackets this time. I am going to cut each piece and weld it all together. To address the vulnerable location of the tank, I will be fabricating a skid plate for it that ties into the main skid and frame rail. The issue with the drain, I'm not sure yet.
 

LBarr2002

LIFETIME
SUPPORTER
#7
I only have a 1 gallon tank and it was hard enough finding a good spot for it under the LJ. I ended up bolting it to the tub just behind the rear passenger foot well where the floor steps up.
 

WolfGT

LIFETIME
SUPPORTER
#9
I'm really anal about a clean look. I will find a spot that is not easily seen. I'm considering putting one right inside each door jam. But we'll see. I'm thinking one one each side or one front and one back.

I went and picked up the new fittings today for this weekend. I also found that I don't have the nutserts I would need to use the screws that came with the kit. So either I would need to drill out the feet to fit bigger screws (which I decided not to do because I didn't want to risk messing up the rubber mounts) or find another way. So I bought a hand full of nuts and bolts that are the same size of the kits and I'm going to weld the nuts to the bottom of the tray. Making captured nuts for easy installation and service/removal.


Sent from my iPad using Tapatalk
 

WolfGT

LIFETIME
SUPPORTER
#10
I worked on this the weekend before last but haven't taken the time to post the progress.

First, I took a few steps backwards. Since I am now going to weld nuts to the underside of the mounting plate for the compressor, my paint job is out the window. I put the plate in the media blasting cabinet and cleaned it all off. Then screwed the nuts onto the plate with sacrificial bolts. I put double nuts on the bottom of each hole to ensure I had enough thread.

Here is some professional booger welds for your enjoyment.

437329D1-E60F-4B77-9ED2-A882C9C8F950_zpsnom55wrb.jpg

A0DF4B5B-3BF5-4057-9674-C143EC9C7253_zps4najob1a.jpg

When I pulled the sacrificial bolts out, I had to run a tap down through each hole to clean up the threads but they turned out good. Here are the fittings I got.

E9BCBED6-CDF8-449D-A632-CD0326AAEDB2_zpswml4srdk.jpg

I wasn't able to find a metal version of the 90 with a barb. So nylon it is (at least for now).

9D017B05-464F-42E4-A18B-2F0032122693_zpspw2maeqn.jpg

Cleaned up the plate, two coats of primer and 3 coats of flat black (didn't like the gloss the first time).

0CA9DB89-3DFF-4FC0-AE27-3463057BC2F5_zpsy2mqalel.jpg

Fittings installed.

10CC2C07-96EF-4616-99F4-1721783FFF48_zpse3uq8fr3.jpg

And lines routed accordingly.

C83B4001-3977-41B1-A50F-BC0199217928_zpslkxb2cw5.jpg

Then the battle began. Holy crap I was about to kill someone, something, anything. The bolts to mount these units in this space is one of the most frustrating things I have done in a long time. I had to remove the mounting feet from one of them and mount the feet first and then reattached it to the compressor. I was not in a good mood after this, but, they are mounted.

1686B3FD-4EEA-4ED6-96FD-1A41A7286680_zpsvdaqvgln.jpg

So, back to the tank mount. After tossing the first attempt. I cut out each individual piece of the bracket.

2D2E5E71-08A5-4DA7-9A3D-7D783D2DA3FE_zpsi9ohgjag.jpg

Then welded it up. Somehow, I forgot to get a picture of it welded together. I'll get it next time.

That is where I stand at this point. Doesn't seem like much but took me most of a day. Until next time.
 
Top